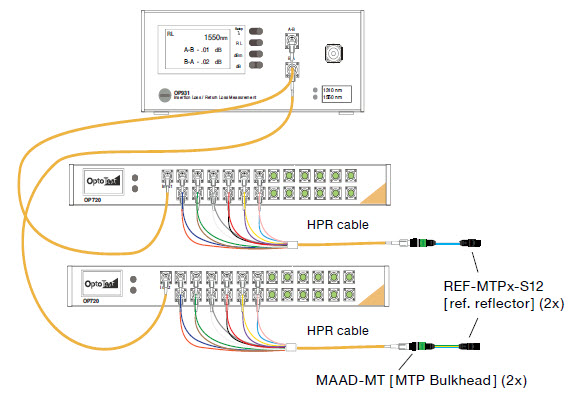
Measuring IL and RL bidirectionally for multiple channels using OP931 and two OP720s
Software and cable configurations that will yield high quality return loss measurements
Overview
With 100G Ethernet and beyond quickly becoming the standard for the fiber optics communication industry, many cable manufacturers want to be able to test multifiber cables with relative speed and ease. Using a single-channel OP931 and two 1xN switches with OPL-Max, an operator can test bidirectional insertion loss and return loss on high-fiber-count cables.
The test setup should be as follows:
* HPR: high performance reference cable
* DUT: device under test
The OP931, bidirectional insertion loss and return loss test set, connects to the inputs of each OP720. HPR cables are then connected to the output of the OP720 (up to 144 channels) which then connect to fanouts with the DUT residing between these fanouts; a simplex DUT is used to reduce the complexity of the illustration.
OPL-MAX Test Sequence
Configuring OPL-Max to run correctly with this configuration is similar to configuring a multi-channel OP930. For a 12-fiber MPO cable, the sequence file should be as follows:
As with all sequence files, Column D will specify which fiber in the cable will be tested, Columns E and F will specify wavelength(s) and Columns G and H specify the power meter and channel used for testing. In the case of the bidirectional test with an OP931, these Columns G and H, as above, should read “OPMRL1” and “2”, respectively.
Since the distance from the front panel to the RL reference is not guaranteed to be the same for both directions, it is advised that Column N appears as shown above. The “1” in the first channel in the forward direction (coming from the A-B port) and a “-1” for the remaining channels in that direction will allow the RL Reference to be copied from the first channel to all forward direction channels. Likewise, a “2” and “-2” for the reverse direction (coming from the B-A port) channels will have the same effect, but allow for these channels to be referenced separately from the forward channels.
Column R is the only fundamental departure from a standard sequence file since it is not necessary to include on unidirectional sequence files. For all forward direction channels, this column should read “0” and for all reverse direction channels, this column should read “1”.
Referencing Instructions
Bidirectional Insertion Loss Reference
To properly reference insertion loss bidirectionally, connect the launch leads from the A-B/B-A source connectors to the input ports of the two switches. Do not use the external power meter port for reference. Connect the reference fanout from the A-B switch to the reference fanout on the B-A switch via a mating adapter and perform an insertion loss reference in the software. This will perform two separate reference cycles—one for the A-B direction and one for the B-A direction.
Bidirectional Return Loss Reference
To reference return loss for a bidirectional test system, connect the system as above leaving end faces open between the two HPR cables to create the Fresnal reflection. If either fanout is terminated in an APC connector, an APC-to-PC stub will need to be utilized to produce an adequate reference reflection. Once the reflection is established, perform a return loss reference cycle in the software. During the reference cycle, the unit will reference both in the A-B direction and the B-A direction and retain these distances separately for their respective measurement cycles.
Measurement Instructions
Once the system has been referenced, place the device-under-test into the setup between the two fanouts and simply select the Test option. Following this, the software will test the cables in the forward direction and then the reverse direction.


